A Simple Method for Solving the 3x3x3 Rubik's Cube
As with any problem, the first step is understanding your objective. For the Rubik’s Cube, the goal is straightforward: arrange the pieces so each side shows a single color. To begin, let’s review the structure of a standard 3x3 cube. It has 6 sides, each with 9 stickers in a 3x3 grid. There are 8 corner pieces, 12 edge pieces, and 6 fixed center pieces (one per side). Notably, on all “odd” Rubik’s Cubes (like 3x3, 5x5, NxN), these center pieces can rotate, but they stay in place, making it clear which color each side should display.
Now, about solving it. The popular “Layer by Layer” approach involves solving the top, middle, and then the bottom layer. However, while it sounds intuitive, it’s actually quite complex. Solving each layer without disturbing previous layers quickly requires lengthy and intricate moves. For example, just placing a piece in the second layer without upsetting the first can take around 7 moves; arranging the bottom without affecting the top and middle can demand up to 15.
In contrast, the method I’ll describe here places all edge pieces in about 3 moves each, revealing that “Layer by Layer” isn’t as simple as it seems.
Until you get the feel for the cube, I’d suggest not relying on online solutions that focus on memorization. There’s a real satisfaction in solving it on your own. And when you see someone using “Layer by Layer,” chances are they learned from a friend or the internet. Also, a tip—re-sticking the stickers won’t help!
Finally, solving the Rubik’s Cube doesn’t require any complex math. I won’t provide algorithms here since part of the joy lies in figuring it out yourself. This guide is meant to encourage new perspectives and show that there’s a simpler approach than Layer by Layer.
Explanation:
-
First, scramble up the Rubik’s Cube, if it isn’t already.
-
All except on corner piece, solve the top layer. This may seem difficult at first, but will become simple as you practice.
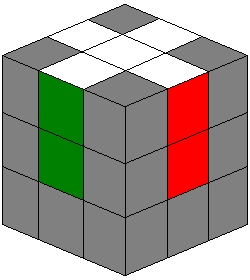 | Just like in the diagram, solve the for edge pieces in the top layer, creating a cross. Ensure that the color orientation is correct all the way around by examining the center pieces color in the middle layer. |
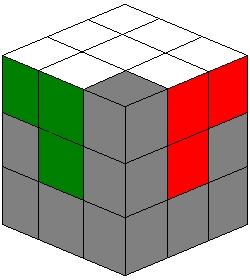 | Next, solve any three of the corner pieces in the top layer, leaving one unsolved corner piece. You may choose to the corner to not solve at your own discretion. |
- Except for one edge piece, place corresponding 3 edge pieces into the middle layer.
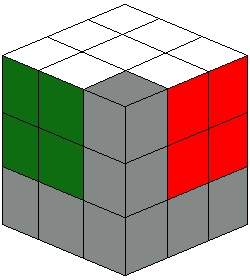 | In order to do this, we are going to make use of the unsolved corner piece in the top layer. In general you first place the unsolved corner of the top layer directly over the place in the second layer where you want to place the correct piece (which must be in the bottom layer). Then in only 3 moves each you can solve 3 of the 4 edge pieces in the middle layer. The resulting pattern should be similar to whats in the diagram to the left. |
- Next, turn the cube upside down exposing the bottom layer.
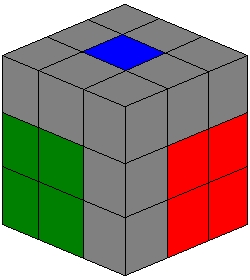 | The unsolved 2 pieces from the top and middle layer in previous steps can now be used to place the edge pieces correctly in the bottom row. |
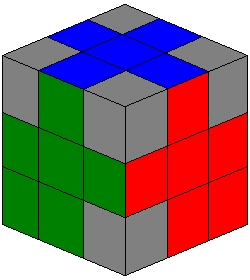 | If done correctly the resulting pattern will be as described in the diagram to the left. |
- Next, place the remaining corner pieces into their correct place, without regarding orientation. Typical algorithms involve the rotation of 3 corner pieces either clockwise or counterclockwise. To do so takes and algorithm of only 8 moves. Depending on probability you may even be lucky enough to solve the cube at this point by simple rotating the corners.
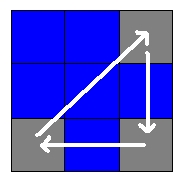 | An example of a sample 3 corner rotation clockwise. |
- Finally, what may seem to be the most difficult part of the cube, rotating two corner pieces orientation. However, this is deceptively easy. As you can see in the diagram if one corners orientation is rotated clockwise, one other corner piece is rotated oppositely. This is because during the process of rotating one corner piece, the cube gets messed up. Then by performing the operations in reverse to another corner piece, it causes the cube to fix itself and rotate one other piece in the opposite direction. It can be viewed in a simpler case such as if you rotate the top face clockwise, naturally by doing the opposite and rotating the top face counterclockwise, you will fix the cube. This principle is in my opinion a key concept in understanding the Rubik’s Cube.
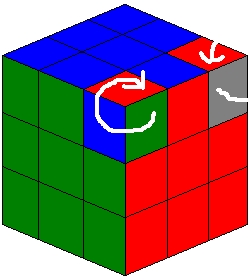 | To perform the rotations shown in the diagram requires and algorithm of 12 moves. However, Don’t be alarmed, half of it is simply undoing what you did in the first half. So it’s really more like 6 moves to rotate a single corner piece in one direction, 1 move to put the next corner to rotate into position, 6 moves to undo the first 6 moves you did which causes the corner piece to rotate in the opposite direction. 1 move to readjust the top layer |
The secret to the Rubik’s Cube is practice. The more you work at it the more you will understand it. Good Luck!
 Arrived
 Ninja Turdle